Wednesday, June 30, 2010

Makin' Maki, or On a Roll with Sushi!

Now, just hang on a second! Sushi is NOT just raw fish! How do you know you don't like it? Have you ever actually tried it? Do you have an open mind? Yes, there are pictures of raw fish in this post, but there are also lovely photos of non-fish and cooked seafood sushi! So, pour yourself a cup of green tea, or sake, and join me, as we explore this culturally different and amazingly healthy food style!
Sushi does require a few specialized 'tools' but they are cheap! You can generally buy a 'sushi kit' at well-stocked grocery stores that will include a rice paddle, a bamboo rolling mat, chopsticks and, often a starter package of sushi rice and seaweed nori.


Sushi Rice is a short grain rice that is washed and then
steamed with Kombo (a type of kelp),


Sushi begins with rice, unlike sashimi, which is the Japanese style of presenting sliced raw fish on its own, or only with garnishes. The origins of sushi date back almost 1200 years, but sushi has only evolved to include rice since about 1700 AD.

Once the rice is steamed, it is 'paddled' with special sushi vinegar, a sweet vinegar, which adds flavor to the rice, but also gives it a glossy texture.


The other ingredients we need include:
  • nori -the thin sheets of seaweed used to contain the rice and other ingredients
  • wasabi - A hot paste of Japanese horseradish
  • Cucumbers
  • Avocados
  • Soy sauce
  • Miso - a fermented mix of soybeans, salt and vinegar (not pictured)
  • Pickled ginger - a garnish and palate cleanser for the plate

The last two, the pickled ginger and soy, are generally served on the plate or as a side for dipping. Depending on how hot you like things, you can mix the wasabi and soy together to create your own personal dipping sauce!


As well as some fresh salmon (above), and tuna (not pictured here)


and some cooked and butter-flied shrimps. Other seafoods commonly included in sushi are cod, snapper, eel, salmon roe, the list is endless... Need a party idea? What about a sushi party? Cook up a bunch of rice, assemble a variety of ingredients and let your guests assemble their own sushi!

If you are going to make your own sushi, go to your local fish monger or the fish counter at your grocery and tell them what you are doing (They won't laugh!) They will be able to recommend the freshest and best cuts of fish available.

Now, most nori that you purchase is already toasted, but I like to toast mine a bit further. I find this helps the texture; otherwise it can be tough and hard to bite through.

It's easy and quick -- just quickly run the sheet of nori over a hot burner a few times; you will see and feel the texture change.


Ready to Roll!


Our first roll will be a Maki-zushi, literally 'rolled sushi'. I have laid out the bamboo rolling mat, set down a sheet of nori and spread a thin layer of the seasoned rice over the nori covering all but the top inch or so. The rice can be quite sticky unless your hands are wet, so keep a bowl of water handy. Now, you can add as little (or none) or as much wasabi down the middle of the roll. I think I was a bit heavy handed here!

Now, we'll add some of our freshly sliced tuna (tekka) and deseeded cucumber strips.


Gently fold the mat and the nori away from you, using the mat to tightly 'snug' the roll together. Keep rolling, lifting the bamboo away as you go. When you get the the end, dampen the end edge of the nori with some water (just run you wet finger along the seam) and the roll will 'seal'.


Now, since we have used Tuna for our roll, we have created Tekka-maki!


One roll generally slices into 8 pieces. So, how does it look? Not bad for not having practiced very much!
Shall we try an inside-out roll? First, we will place a piece of plastic wrap on our bamboo mat, and sprinkle it with toasted sesame seeds (many inside out rolls use fine fish roe instead). Then, with wet hands, we will spread a thin layer of sushi rice, as before. Finally we will place our sheet of toasted nori on top, and a bit of wasabi, if desired. If I lift the corner, you can see the structure....


I've decided to add cucumber, avocado and the cooked shrimp... That is part of the beauty of sushi! You can make up your own flavor combos!


Like before, we will gently fold the roll over, pulling away the plastic and the mat, but pulling them snugly into the roll to form the rigid shape.


Our finished inside out roll. Had we not added the shrimp, this would be a classic California roll.
Now, for another type of 'roll'... The hand roll, or Nigiri-zushi. Nigiri means 'squeezed', referring to the way the rice is squeezed into a ball in your hand before being combined with the topping of choice. Form several ping-pong ball size balls of sushi rice, and set aside. Then take your 'topping', in our case a butterflied cooked shrimp (ebi), or avocado slice, and lay on the fingers of your left hand. Place the sushi ball on top and gently squeeze. Set the sushi down, rice side down, and gently form the rice into a tidy bundle under your topping. Often, Nigiri-zushi is 'belted' with a strip of nori.
Now, for our final roll, the cone roll, or temaki-zushi. These are so easy to make, and can include almost any ingredient. They are also easy to eat, so they make a great party dish.
First, cut your sheet of nori in half and then thinly spread sushi rice over the bottom half.


Holding the roll in your left hand, add your fillings.


In our case, tuna and deseeded cucumber in one roll, and salmon and avocado in another.

Shall we eat?


Salmon and Cucumber Maki-zushi with soy and wasabi for dipping, garnished with pickled ginger and seaweed salad


Inside Out Maki-zushi with sesame seeds on the outside


Belted Avocado Nigiri-zushi with a button of Miso paste


Our shrimp hand roll, or Ebi Nigiri-zushi


Salmon and Tuna Hand Rolls


Tuna and Salmon Cone Rolls


All Gone!

So, are you a convert, or were you already a fan?

Dom Arigato!

Tuesday, June 22, 2010

Mezze'n Around With Grape Leaves, or Doin' Dolmadas

I've always enjoyed making what I call 'fiddly food' -- the labour intensive dishes, often specific to regional cuisines -- the Gyoza or pot-stickers of Japan, the wide variety of Spring Rolls from all over Asia, Tamales from Mexico, and of course stuffed grape leaves from the Middle East. While seemingly tedious, I love making these dishes for a few reasons. I find it strangely therapuetic, for one. I also enjoy these different flavor combos immensely, and love having them home-made rather than from some big factory. I also enjoy taking a bit of liberty with the traditional recipes and adding a few of my own favorite flavors...

(Um, speaking of taking liberties, watch this space -- we're cookin' up some serious Fusion Confusion in the next few weeks!)

Stuffed Grape Leaves, or Vine Leaves, as they are oftern called, are common in all Middle Eastern cultures. Recipes vary somewhat, as do names. Most frequently they are called dolmas or dolmadas, but I beleive that dolmathakia is the correct Greek word. I have also seen them referred to as Yaprak or Yalangi, as well as Warak Einab. All of the recipes include rice, but what goes in the rice can vary. There are usually some herbs, most commonly mint.


Maybe some sauteed onion...


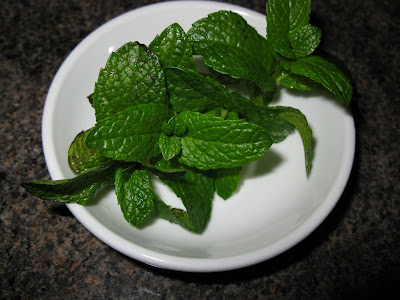
I like to add toasted pine-nuts, for a bit of crunch and extra favor. Many versions are vegetarian, but some do include ground lamb (lamb is very common in Middle Eastern cuisines) or ground beef. I followed My Own Famous Grape Leaves from AR. I made the rice one evening, intending to stuff the leaves the following day, but the rice was so good, The Man, a true rice freak, got stuck into it and we just had to have it for dinner! I will make rice this way again, just for the rice! As the recipe states, I chopped an onion and put it in a sauce pan with some oil, added the rice and stirred it over heat for about 5 minutes, or until the onion was clear. Then, I added some fresh mint and dry dill tips. Instead of chicken stock, I used vegetable stock, put the lid on the pot and let it simmer/steam for 15 minutes. I lightly toasted some pine nuts and mixed them in with the warm rice later.

But, ALL Dolmadas recipes start with the Grape Leaf itself. Grape vines grow well and commonly in the warm climate of the Mediterranean and Middle East, and I would imagine, that like so many evolving cultures, they were looking for ways to use anything at hand. Grape leaves in their natural state are rather tough, but young leaves that have been blanched and brined become more tender and supple. I usually buy mine in the jar, but any industrious sort (you know, the kind that likes to hang-out on AR) could (and would, just because she can) certainly try to blanch/pickle/marinate/smoke/re-boil/re-pickle their own!!!


Being less industrious, I buy mine...


First, carefully remove a wad of leaves from the jar and unroll/unfold them. Spread out a leaf, shiny side down on your work surface. The leaf will usually have a bit of stem still attached and you should snip it off.


Turn the leaf so the stem side is closest to you on your work surface, and put a spoonful of the rice next to the stem.


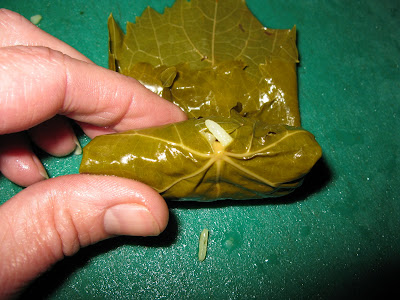
Fold the sides of the leaf over the rice to cover it...

Press the sides of the leaf snuggly against the back of the rice ball, to form a log shape, and gently, yet firmly roll up the log to the end of the leaf.


Place the dolmada in a large pot, and continue, continue, contine until the pot is full (or, the jar is empty!!!

Cover the dolmadas with just enough water to cover (some recipes call for topping the dolmadas with slices of lemon, or even rhubarb, at this stage) and simmer/steam for about 50 minutes.

Dolmadas usually are just one item found on a Middle Eastern mezze platter. The mezze is the appetizer or starter course. It can be small, large or huge! It always includes a delicious assortment of finger foods: dolmadas, pita bread with dips such as hummus and babaganoush (roasted eggplant dip), possibly feta cheese, kibbeh (small cigar shaped meatballs made from lamb) and olives. Depending on the culture, the dolmadas are usually served with some sort of minted yoghurt dip, either a garlic-y Greek Tsaziki or a lemony, minted yoghurt.

So, next time you need a good but possibly slightly exotic finger food, why not roll up some grape leaves?

Wednesday, June 16, 2010

Breaking Some Eggs, or Winter in the Hilltop Kitchen

This has been a great week! The Austerity Campaign is bearing fruit, maybe not great, big, juicy ones, but productive fruit, none the less. We keep hearing horror stories from sales reps about debt collectors, closed accounts, businesses going under... We are okay, but I dare say, if we hadn't reined things in a few weeks back....

My accounts payable are going down, down, down. My wage bill has halved. The inventory is ticking over. Wastage is minimal The Man and I are working harder than usual, and I for one, am enjoying it way more than normal. Life is Good!

Today, everyone wanted omelets. Omelets are actually one of my favorite things to prepare. I know the mere word "omelet" puts fear in the bones of many a seasoned cook. Funny thing, though -- I struggle with omelets at home, but not in the commercial kitchen. I put it down to the well-seasoned skillets and gas cook-top.


I am making a tomato, mushroom and bacon omelet for you! Slice the tomato and mushrooms. Dice and fry up the bacon. When the bacon is done, I toss the mushies into the pan with a bit of butter (Hey, I'm these peoples cook, not their dietician!) and saute until tender. Meanwhile, I heat a bit of canola oil in one of the well-seasoned skillets. I broke two of Flo & Myrtles finest fresh laid, free-range eggs into a bowl, added a bit of cream, parsely, S & P, and gently mixed. Beating eggs is NOT the secret to a fluffy omelet. Like muffins, gentle mixing, until just blended is all you need.


The skillet is now hot, and as I pour the eggs into it, I want to hear a nice sizzle. As the eggs cook around the edge, a gentle tip of the pan, while gently pulling the edge back with a spatula to let the runny stuff flow under, creates the perfect omelet.


Lift, tip and flow until the top of the omelet is almost done, or bavois as the French fancy chefs call it...


Top with your fillings, and pop the pan in the oven for a few minutes. (If you are doing a cheese omelet, this is when you cheese will melt).


When nice and puffy (and the cheese melted and all the fillings hot), remove from the oven.


Easy does it with a spatula, fold and plate!


Bon Apetit!

Now, the Austerity Army's Commander-In-Chief sold out of the lamb-burgers! But, we still have ground lamb in the freezer. Hmmm... Moussaka, Shepherd's Pie or Lamb Burgers again? The Man cleverly points out that the burgers are more profitable. Lamb Burgers it is! And, I get to make them. My Way! Well, we often do the Lamb Tagine recipe from AR as a weekend special. This tagine is GREAT! As the description says, don't back away because of the long list of ingredients, mostly spices. Well, we do this often enough and in large enough batches, that I mix up the 'rub' in big batches. I love doing it because it looks and smells gorgeous.


On to the lamb burgers... Two kilos of ground lamb (about 4.5 lbs), about 1/4 cup of the Tagine spice mix (because it just screams out lamb!), some freshly picked and chopped mint, about a cup of rolled oats and 2 eggs to bind. The Man suggested I use the KA with the dough hook, but there is something deeply satisfying about getting in there with your hands.


Once mixed, it was time to 'scale' the burgers. In the cafe, we use the scales a lot. It helps with portion control and consistency. I made 16 x 160 gram burgers (almost 1/4 pounders) from this.


Now, it is time for a restaurant reality check. We bake our burgers, to a food safe 64 C temperature. I am so sorry, but when you order a burger, it will be re-warmed. It WILL taste excellent, and it WILL be plated to order, but the batches WILL be cooked ahead. Explanation: We may sell all 16 lamb burgers tomorrow. We may not sell any lamb burgers for several days. Raw lamb burgers do not store well. It would also take 15 minutes or so to cook your burger from scratch and I know you are hungry and don't want to wait!


So, lamb burgers done! (Note to self: must make burger buns first thing in the morning -- GO PROJECT BREAD!!!)
And, the highlight of my day! A party of three, an elderly couple with their (ahem) fairly middle-aged daughter. To start, three Tomato and Basil Soups (with home-made rolls, thank you again, Project Bread!). And then, two Akaroa Salmon on Dauphinoise! Mom doesn't eat much these days, so the two Salmon will be shared between the three.


Akaroa Salmon with Hollandaise on Wilted Spinach and Dauphinoise!
(You know what? Bacon grease is the BEST thing for wilting spinach, and I had lots left over from those omelets!)
Akaroa Salmon comes from "OUR" Akaroa Harbour (we look out on it every day)! It is farmed, but it's farmed in the Pacific Ocean (actually, in the entrance to the harbour, which gives it a great sea-water taste,) sustainably, and was good enough for no less then Bill Clinton on a recent State Dinner NZ trip! It's something we LOVE to serve because you can see where it came from as you eat it! NO food miles!!!
This family hung around for ages! They were clearly having a great time. I cleared the table after the soup: "Lovely!". I cleared the table after the Salmon: "Can we take the leftovers home? We keep picking at it, but just can't finish it."
This is NOT me patting myself on the back. This is me feeling like I have made people happy. And, as they walked out the door, apologizing for staying SO long (they certainly had not outstayed their welcome), I thought, that might just be one of Mom's last lunches out. I am SO glad they enjoyed it so much! Oh, there are so many reasons why I like cooking!

Monday, June 14, 2010

Very Rough Draft: Fusion Confusion

WORK IN PROGESS!!!


Raw Baby Octopus


Cooked Baby Octopus


Plated Baby Octopus Nigirizushi or Hand Rolls, 'belted' with Grape Leaf


Baby Octoppus Nigirizushi, 'belted' with grape leaf and garnished with Pickled Cucumbers


Sushi Rice on Grape Leaves


Grape Leaves on Sushi Mat, overlapped for a smooth roll


Sushi Rice seasoned with Fresh Mint and Dill Tips


Seasoning the Sushi Rice to get the right texture and flavor


Typical Greek Ingredients


Marinted Cucumbers replace the Pickled Ginger in Greek Sushi


Tsaziki (yoghurt, garlic, grated cucumber and dill) stands-in for Wasabi in Greek Sushi


Horiatiki Makizushi, or Country Greek Salad Roll


Kefte and Feta Makisushi, or Minted Lamb & Roll


Close up of kefteand Feta Roll


Making Grilled Haloumi, Cucumber, Tomato and Olive Cone Roll


Finished Grilled Haloumi Nigirizushi, or cone roll.


Chopsticks at Rest!